
Left Facing Page and Close-up

Right Facing Page and Close-up


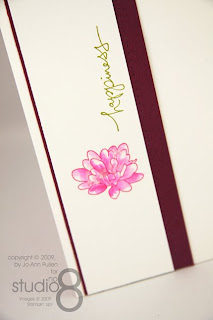
Recipe for Page 3 (left facing page):
Supplies:
Paper: Whisper White card stock, Rich Razzleberry card stock
Ink (all classic): Old Olive, Melon Mambo
Stamp Sets: Flower Lines Stamp Artwork, Warm Words
Misc: Paper Piercing Tool, Mat Pack, Blender Pens, 2-way Glue Pen, Powder Pal and Dazzeling Diamonds
Paper Size:
Whisper White (all pages) 6 w x 9 h
Rich Razzleberry 2” w x 9” h
Whisper White 1 1/2” w x 9” h
What I did:
- For this page I stamped the Water Lilly image on the Whisper White 1 1/2” w x 9” h card stock with Melon Mombo Classic Ink.
- With blender pens and Melon Mombo Classic Ink I painted the inside of the flower making sure to be darker inside and lighter towards the outer edges.
- Using Old Olive Classic Ink and Whisper White 1 1/2” w x 9” h card stock stamp the word "happiness" (or any message you want) as per sample.
- Using the Two-way Glue Pen and the Whisper White 1 1/2” w x 9” h card stock which you stamped with the Water Lilly image, in a painterly fashion add some glue to the flower.
- Take the Dazzeling Diamonds and using your Powder Pal to catch any excess glitter pore onto the flower to give it some texture and sparkle. Let dry and then brush off any excess making sure to do so over the Powder Pal so none is wasted.
- Using the Rich Razzleberry 2” w x 9” h card stock and with the Piercing Tool and Mat Pack I pierced alone on edge (on the right side) giving it a textured feel.
- Assemble.
Recipe for Page 4 (right facing page):
Supplies:
Paper: Whisper White card stock Rich Razzleberry, and DSP Paper Lovely Flowers
Ink (all classic): Rich Razzleberry
Stamp Sets: Flower Lines Stamp Artwork
Misc: Paper VersaMarker Ink Pad, Cutter Kit, Blender Pens
Paper Size:
Whisper White (all pages) 6 w x 9 h
Rich Razzleberry 5” w x 6.5” h
DSP Paper Lovely Flowers 4.5” w x 6” h
Whisper White 1 3/4” w x 2” h
What I did:
- Using the VersaMarker Ink Pad and the Water Lilly stamp from the Flower Lines Stamp Art work stamp a pattern in the background and let dry.
- Take Whisper White 1 3/4” w x 2” h and stamp one Water Lilly stamp, using the Rich Razzleberry Classic Ink Pad.
- With Blender Pens remembering to work from the inside out – dark to light to give it shape and form.
- Once dry take the Cutter Kit and the distressing tool rough up all edges and bend ends in.
- Assemble as per picture.
Day 2 a complete success!
1 comment:
Hey: Could you explain what you mean by "left facing" and "right facing"? THANKS!
d
Post a Comment